The Most Comprehensive Crossdressing Guide on How to Create Cleavage
A good cleavage is, without a doubt, one of the main features of feminine sexiness. They are way more likely to be noticed than anything else on your look. For crossdressers, a cleavage can draw attention away from the rest of your body, enhancing your femininity as it helps you to pass as a woman. With that in mind, many crossdressers would love to achieve a natural, good-looking cleavage!

Actually, most crossdressers can, yet they don’t know how. In theory, any crossdresser can achieve a decent cleavage, with proper tricks. A little bit of information can help since there are some painless methods that can be replicated by anyone. You can use makeup to contour your chest, a Nubra to push up your natural bust, or even silicone breast forms for a more realistic approach.
In this article, I will be talking about each one of these methods, explaining them in-depth, and bringing up a few more tips for each one. The aim is to spread information and help other crossdressers to achieve a sexy female cleavage, without pain or too much effort. So, let’s get started with the methods:
TABLE OF CONTENTS
1. Chest contouring for cleavage
This is a rather basic, yet practical method of creating a visually convincing cleavage. It follows the same principles as face feminization, involving the use of makeup to contour your chest. It will be reshaped, creating the illusion of cleavage. Of course, before you start, you’ll need to shave your chest in order to have a clean, smooth surface to work with and apply the proper makeup. With that in mind, here are the steps you must follow to implement the said method:
● Step 1: Gather your tools!
To make things easier, I recommend sorting out your materials and tools before you start. The tools you’ll need for this method aren’t too difficult to find, but it’s better to make sure you have everything handy just in case.

First, you’ll need a mirror to keep track of your progress. I tried it once with my smartphone’s camera, but it wasn’t as effective. I also wouldn’t recommend you to do that by looking down at your chest. That’s because the perspective is far from the same, and it could result in some pain in your neck. The best shot is a wide mirror that grants you a perspective of your whole body.

Besides that, get a contour palette with different shades, and your favorite brushes. If you don’t like to use brushes, you can use your fingers instead. But you’ll have to be extra careful and delicate in order to achieve a natural effect. Bronzers, concealers and highlighters are also recommended, but that’s up to you and your own makeup skills.

All of the supplies listed here are available online and can be discreetly received. You can find them with worldwide shipping at amazon, or in stores specialized in gender-affirming makeup such as Jecca blac. If you have a favorite supplier, you can always ask for what they have available, but it might limit your options.
● Step 2: Start contouring
The main goal of the contour is to create a silhouette in your chest. It will look like there are two breasts in the area. Use a shade about two or three tones darker than your skin tone, and “outline” the silhouette just as shown below.

The darker tone will pass an impression of depth as if it was the shadow created by actual breasts. With that in mind, avoid making “circles”. Instead, put the contour where the natural shadow would be. Mainly, in the rift between the two boobs.
● Step 3: Highlighting
This is the opposite of the contour part. You need to use a light shade, lighter than your skin tone. And you’ll be applying it where you want the more voluminous areas of your “breasts” to be. This is useful to create more realism, by manipulating light and adopting a few reflection tricks.

By highlighting these areas, you’ll make them look farther from the ones you applied contour. This trick plays a major role in creating the “size” of your cleavage. It also helps to define the shape of your “breasts” and feminize the region even more.
● Step 4: Blend the makeup
These are the finishing touches, that will increase the realism of your cleavage and turn the makeup into a seamless trick. Pick a shade that is in between the ones you’ve used before (for contouring and highlighting). This shade should be close to your actual skin tone.

Apply it all the way through the borders of your contour and highlight, and make sure to spread it well. The whole point of blending is to conceal the edge of the makeup you’ve previously applied, making it look more natural. To enhance the effect, it’s recommended to use a brush instead of your finger, to make sure it will blend better.

Well, the main advantage of this method comes from the fact that it’s painless and a relatively fast way to acquire a sexy cleavage. It’s also cheap and can be done on most occasions. However, it does have a few drawbacks, such as the need for shaving, and the requirement of certain makeup skills. Also, even though it looks great in pictures, you won’t get the physics and movements of real breasts, lacking the weight of it.
2. Nubra for cleavage
A Nubra can lead you a step further, by creating a cleavage more realistic than makeup alone ever could. The point here is to use them to compress and push up the natural fat and skin from your chest, creating enough volume to simulate real breasts. How to do that, you ask me? Well, here’s how:
● Step 1: Get a Nubra

First, of course, you’ll need to buy a Nubra or something similar. They generally consist of two adhesive bra cups that can be later connected through the use of clasps located in each one. You can get them at department stores, underwear stores and even some drugstores. However, if you want to keep your privacy, you can buy them online from Amazon or the official Nubra store.
● Step 2: Attach the bra cups
Do it one at a time, because it’s easier. Clean your skin with soap and water, and dry it with a soft towel, to increase effectiveness.

Place it in the desired position, with the clasps facing downwards (pointing towards the direction of your belly button). Keep in mind that the further away you place the cups from each other, the tighter they will hold, and the more realistic your cleavage will look. Just be careful to put them too far apart, or you could end up harming your skin and hurting your chest. Repeat the process with the other cup, and we are good to go
● Step 3: Connect and close the clasps

Now that you’ve placed the cups in their proper places, you need to close the clasps. Grab both of them, and pull them together. Then, slide the end of the right-side clasp into the left-side one, snapping them into the locked position. Press them for a few seconds, holding the cups into place for a secure hold.
● Step 4: Put on a pushup bra to enhance your look
You can also enhance your cleavage by incorporating makeup, pushup bras, and breastforms. They will work together to create a more realistic look, granting you a sexy and passable cleavage.

The overall advantages of this method are the realism and the price but be careful. It’s not the most comfortable method, and if you don’t take care, sweating may cause the Nubra to fall off. Shaving is also required here, to smoothen your look and make your chest less masculine.
I see this method as something better suited for crossdressers who are on a budget, as it’s relatively cheap. However, considering the long-term run, it would be wise to invest in something more durable. That’s because Nubra’s adhesive starts to wear off after a few applications. With time, it becomes less effective, so you’ll need to spend more money on replacements.
3. Bra stuffing for cleavage
This one is a classic, used by many beginner crossdressers. A stuffed bra aims for volume and weight and is more suited towards outfits with less exposure. I like to recommend the use of this method combined with others as well, mainly with the makeup one, as it allows you into a wider variety of outfits. This is how you stuff a bra:
● Step 1: Understand your size

For this method to work properly, you must get your bra size right. If you get a smaller one, you’ll end up having a hard time trying to wear it. Not only you won’t be able to fit any stuffing on it, but you may also hurt your skin by forcing it against the bra straps. On the other hand, if you choose one that’s too big, the “stuffing” will be loose and hardly stay in place.
To find the perfect bra size for your frame, take a measurement of your chest, just below your nipples. Then, add about 5 cm/ 2 inches to account for the stuffing, and compare it to this chart:

● Step 2: The stuffing
After you get to wear a bra in the proper size, it’s time to start stuffing it properly. The best materials are socks (or any kind of similar fabric you have) and silicone “cutlet” inserts, also known as falsies. They hold still and are easy to keep in place, requiring minor adjustments once you find the ideal position. You can also use a balloon half-filled with uncooked beans, as long as it’s not too big and well-tied together (with no air bubbles).

With that said, I do not recommend Kleenex, toilet paper, cotton balls, or any other disposable paper products. Paper stuffing hardly stays in place and has a tendency to clump, slip out the sides, and fall apart, which makes it rather unreliable.
● Step 3: Put everything together

Now that you have both the bra and the stuffing, it’s time to put everything together and form your breasts. My advice is to start by putting on the bra. If you are not yet familiarized with bras, you can start by wearing them backward, with the bra helper clips on your chest, instead of the cups. Then, clip the straps and flip them around so the cups are facing your chest.

Once you manage to put on the bra, pull the cubs so you can fit the stuffing inside. The idea is to place the stuffing on the base of the bra, so it sort of pushes up your natural chest. adjust it at will, until you think it looks nice. If you’re using this method alone, remember to use just enough filling to make them look like regular-sized breasts.

This method is really cheap and works great for some outfits. However, it’s recommended for those with more coverage. It imitates breast volume in a very cost-effective way but fails a bit on the cleavage part. This way, it limits you to outfits with less exposure, unless you combine it with other methods.
● Combining methods
The first 3 methods I mentioned, can be combined together. Such combinations can be used for 2 main purposes, fitting different types of crossdressers. The first purpose is to achieve a more realistic look, achieving a cleavage that suits different outfits – Even the more revealing ones. The second one is to create breasts that are more exaggerated in size, even if they don’t fit your frame.
The main premise for both of them is to use the three aforementioned methods at the same time. This way, the stuffed bra will create the desired volume and “movement” for the breasts, while the Nubra secures everything in place. As a finishing touch, the makeup will highlight your cleavage, making it more believable.

From my personal experience, this combination works. The results are great, but you’ll have to waste more time and have more patience. With that in mind, it’s up to you to try out and decide if combining them is worth it for your particular case.
4. Tape for cleavage
Taping can be seen as an even cheaper alternative to the Nubra method, but I wouldn’t say that. Tape, when used properly, can give you more freedom and allow you to wear different outfits, without bras. It only depends on how you apply the tape, according to which outfit you want to wear. I’ll give you some general directions about taping, and a few specific instructions on how to wear it. I must also add that this method is better suited for crossdressers with some chest muscles or fat. That’s because it wouldn’t be practical for flat-chested crossdressers.
● General recommendations
Well, the most important thing is to choose the correct tape. If you choose the wrong type, you might end up harming your skin or failing to hold your “breasts” in place. To make things clear, I must say that the tape should be firm enough to act as some sort of improvised Nubra. Yet it shouldn’t be strong or sticky enough to pull your hair when you remove it.

My recommendations are medical adhesives (which allow your skin to “breathe”) or PVC tapes. They are available in most drugstores and markets, and if you are lucky enough, you may find something in your skin tone. Stay away from strong duck tapes, such as the famous “silver tape”. They are very sticky and almost certainly going to hurt your skin.

Shave your chest, so the tape has a clean surface to stick to. You may also clean the region with water and soap. My last piece of advice is to protect your nipples as well, with paper towel or silicone protectors. Now, here’s how to wear it:
● Wear the tape

To wear the tape and create cleavage, start unfolding it from the roll. hold one end with one of your hands and pull your “breasts” together with the other one.

Make sure you leave a small gap, of about an inch between them: it increases the realism of the cleavage. Once you feel they are pressed enough, apply the tape. One or two layers should be enough, but if you feel that it’s not secure yet, reinforce it. To better reinforce the tape, you can roll it all around your chest after the first two layers.

Also, if you don’t have that much flesh in your chest area, you can still maximize the effect of this method. To do that, apply makeup on your cleavage and use a lightly stuffed bra. It might compensate for the lack of volume and create a very believable cleavage. However, if you are still unable to achieve a satisfactory volume, try the next few methods, as they are better suited for this situation.
5. Pocket bra for cleavage
I know what you are thinking. “Aren’t these just fancy versions of the stuffed bra method”? I assure you they are not. Pocket bras add a lot more realism into play since you can fit silicone breast forms inside them. Although they are more expensive, the added realism is a key feature that increases your “passability”. This is a quick tutorial on how to wear them:

● Step 1: Wear the bra and prepare the forms

Wear the pocket bra just like any normal bra. Just like I said before, If you are not yet familiarized with bras, you can start by wearing them backward (see the bra stuffing method). After that, make sure to sort each form. They look a bit like “water drops”, and the nipples should be facing outside.
● Step 2: Slide the forms in

Spread the elastic opening on one of the cup parts of the bra. Carefully slide one of the forms inside the pocket, and adjust it inside. Try to settle the form on the bottom, but be careful not to fold it. The recommended way to handle the forms is by holding them by the edges.

● Extra tips

Another useful tip on this method is to put the forms inside the pockets before wearing the bra. This is recommended for those who are already used to wearing bras, as things become a bit more complicated. To do that, lay the bra on a flat surface, with the inner part facing you. Slide in the forms, and hold it to check if everything is okay. If you are happy with the results, proceed to wear the bra with the forms already in it.
6. Vest-like silicone breast forms for cleavage
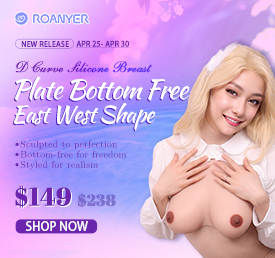
This option is ideal for most cases, as it’s both practical and effective. Crossdresser breast forms from Roanyer are worn the same way as vests. They come filled with either elastic cotton or silicone gel, with realistic movement physics. The silicone has a lifelike texture, so it looks and feels like real human skin. The effect is seamless and very convincing, granting any crossdresser a perfect cleavage. If you choose this method, here’s how to wear one:
First, clean the product with water and let it dry. After that, apply baby powder to the inside and outside, to make it easier to wear. Another thing I want to encourage you to do is to wear a hairnet. It is important to wear one because it reduces the friction of the silicone when going through your head.

Push the vest up with both hands and fit your head up the neck hole, stretching it carefully.

After that, fit your arms through the other holes, one at a time, but try not to tear them. Finally, adjust it to your body until you feel comfortable, making sure the breast forms are in place.
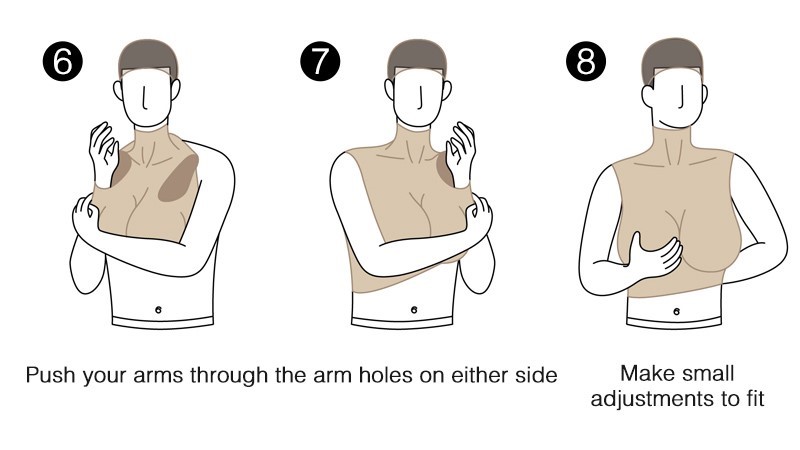
This method’s advantages are the high level of realism and the quick, painless process you have to undergo when you wear it. One of the disadvantages is the price since it’s a bit more expensive. The other one is the fact that summer days and hot weather will make it hard for you to wear them for a long time.
You can order them from the roanyer website. Shipping may take a while, depending on your location, but the results are totally worth the wait. Some models have more coverage, allowing you to hide your shapewear. With them, you’ll be able to wear revealing outfits such as lingeries and bikinis.
7. Targeted exercises for cleavage
Although exercise itself won’t grow you a pair of breasts, it can help you with your cleavage. The aim is to develop your pectoral muscles, in order to gain mass in your chest area. This way, you’ll maximize the effect of Nubras, push-ups and tapes, creating a more natural look on your cleavage.
My sincere recommendation is for you to get help from a professional personal trainer, or to start going to the gym. That’s because each individual has a unique body, with its own requirements. At a gym, or with a personal trainer, you’ll better understand which exercises are better for your body. And thus, you’ll learn how to develop the muscles you want, increasing the mass on your chest. Nonetheless, here’s a couple of exercises that you might want to get used to:
● Decline press-up

With your feet well-positioned on a bench, plant your hands on the ground in front of you. Keep lowering your body until it nearly touches the ground, then press it back up. Wait a few seconds and then repeat.
● Staggered press-up

Hold a press-up position with your hands staggered, with the right hand further forward. Lower your body until your chest nearly touches the ground, then drive up as fast as you can. switch your hand’s position, then repeat.
● Clap press-up

Again, get into a push-up position. This time, keep your hands just outside of your chest. Keep your feet apart, in a width similar to the one of your shoulder, and your body forming a straight line from head to heels. Brace your core. Lower your chest to the floor and then press up very fast so your hands come off the floor, clapping once at the top of the movement.
Those exercises are aimed at your chest muscles, inducing them to grow. With that in mind, try not to exaggerate, since you could end up with a very masculine chest.
As we can see, cleavage can help crossdressers to pass, increase their femininity, and even improve their overall sexiness. It’s a key feature to look feminine, and any crossdresser can achieve it by using one of those methods. Each person might prefer one of the methods since each crossdresser is unique (such as their needs).
Some of our crossdressing sisters think it’s impossible or too hard, but It’s just a matter of practice and information. Choose the method that suits you the most but remember to spread those tips to other sisters in need, to help the crossdressing community as a whole!
Tagged With:Crossdressing Cleavage , Silicone Breastform
1 comment
Leave a Reply
- How to Achieve a More Feminine Body: The Ultimate Femboy Fitness Guide
- What Piercings Enhance Feminine Expression for MTF Crossdressers
- 8 Tips for Crossdressers to Get a More Feminine Body Without Hormones
- How to Make Your Boobs Bigger Without Surgery: A Guide for MTF Crossdressers
- 7 Easy Ways to Level Up Your Sexy Femboy Beauty Routine Instantly
- Bouncy Breasts 101: Tricks Every Crossdresser Should Know
Established in 2009, We are a recognized manufacturer and seller of professional crossdressing products.
It is our aim to become not just the most creative manufacturer but also a very considerate seller, as we provide the best quality products for crossdressers all around the world.





 Breast Forms
  Body Suit
  Realistic Mask
  Femini Girdle
 Hip & Butt Enhancement (8)
 Penis Prosthesis
 Fake Muscle
 Bikini
  Wig
Wig  Corsets
 Course
 service@roanyer.com
 +8618652200711
 Facebook
 YouTube
 Twitter
 Instagram


Vest-like silicone breast forms are great, but how can you blend them to more exactly match your skin color?
Mine is a bit more pale than my natural skin.